Showing all posts tagged a-detailed-palette-feed:

How To Optimize Storage In A Walk In Closet?

Some people think a walk in wardrobe is essential. It certainly beats a wardrobe closet, where you can hardly see what is in it, and things get crammed to the back. The only issue though is that , with all of this space, naturally you will accumulate things, which will make even the biggest walk in wardrobe look small. Find out how to optimize storage today.


We will look at how to build a walk in closet from scratch and how doing this may maximize storage, because it has been organised by YOU!


Walk In Closet


The walk-in closet has been around from about the 18th century onward. This is when clothes were an asset and an indicator of wealth. The walk in closet makes it easier to see all of your items, and organize your space. The storage, although you may think the walk would take up space, it actually maximizes it and helps to sort and organize items and ideas.


We have all seen the Kardashian walk in wardrobe. The Kardashian walk in closet seems like a shoppers dream, and it is immaculately organised and everything is stored amazingly. But how?


We will look at how to build a walk in closet step by step, and more.


How To Build A Walk In Closet?


Ever wondered how much to build a walk in closet? It isn't as much as you think. The only real materials you need are wood and some screws. The cheapest closet could only set you back around $100. Let's explore how to make a walk in closet.


If you have a room you do not use adjoining your room this will be the easiest way to build a walk in wardrobe.


Simply knock the wall through and make a space wide enough for a door


Seal up the other entrance to the room


You can put a door from your room into the closet or leave it to be an open walk in wardrobe.


Then you need shelving and, this can be the hard part because it requires planning and a little forward thinking.


Overall a do it yourself walk in closet is not too hard to achieve. Find out more DIY Furniture projects here!


How big is a walk in closet?


Any size you want! Some people just require a 3m x 1m space to organize a little better than a wardrobe, and others love a large closet that they can walk in and get ready. The choice is yours and how much space you have.


Small Walk In Wardrobe Storage Ideas


If you are looking at how to maximize space in a small walk in closet, look no further!


Fold your clothes - this way they will take up less space


Stack items you do not use


Donate! Donate items you do not want


Store. Use storage trunks to store clothes and things that can be stored away: summer clothes in the winter, or winter boots in the summer. Or even swimming gear... you name it!


How To Design A Walk In Closet?


You need to think about what you are going to store in the closet, Coats, shoes, shirts, dresses. Some items are longer than others, so you must take this into account. Shelving is brilliant and under used, especially wall shelving that can be stacked at height, reducing space and maximizing capacity. Modern walk in wardrobe ideas are super clean, minimalist and chic.


A walk in closet will transform your bedroom and make it more minimalist, and maximize more space because clothes will be taken out of the equation! You may want to totally revamp your bedroom after this, view our apartment transformations bedroom, for more bedroom transformations!


How To Optimize Storage In A Walk In Closet? was first seen on www.adetailedpalette.com


via A Detailed Palette - Feed https://www.adetailedpalette.com/how-to-optimize-storage-in-a-walk-in-closet/

How To Measure For  Wallpaper – and Other Wallpaper FAQ’s

Let's start with the basics


What Is Wallpaper?


The clue is in the name. Paper that goes on walls. Usually used as a form of decoration, and to add vibrancy to a homestead. Today we will learn facts, tips and techniques and traditional wallpaper methods that are still used today.


History Of Wallpaper


Believe it or not, 4000BC is when the first known instances of paper were introduced; we know it today as Papyrus; invented by the Ancient Egyptians.


Wallpaper is thought to have been invented by the Chinese, in around 200BC. The Chinese used decorated rice paper and glued it on their wall .


It was only around 100BC when the Chinese invented the technique of paper making that we know today, using waste fibers and flattening it out to create a sheet.


15th century france saw wallpaper come to the Monarchy at the time with Louis XI ordering 50 rolls of hand painted religious blue wallpaper.


The technique of hand painted wallpaper was never really going to take off and it took the arrival of the printing press for it to become a viable decoration for the home. The printing press ensuring quality and consistency.


The 16th century marks the start of wallpaper we know today.


How To Start Wallpapering


First you need to prepare, because, i know we all hate these words, but ‘preparation is key’.


Wallpaper is about 90% preparation 10% actually wallpapering. Make sure you have a clean, dust free room, and a straight flat wall.


You may need to get the wall skimmed to make sure it is a smooth surface, also make sure you have sanded, or filled in any gaps, as these will show through when you start to wallpaper.


Got that ? Brilliant. However, if your wall still has old paper on it, you may want to remove it . you can paper over wallpaper if it is smooth enough, and isn't prone to falling off.


How Many Times Can You Wallpaper Over Wallpaper?


Pretty much as many as you want, as long as it isn't peeling off the wall. If it ain’t broke, don’t fix it. I recently flipped a house that had some victorian style paper on it 10 layers deep!


How To Remove Wallpaper.


So you have decided this paper is unsalvageable. Its faded 70s pattern just isn't cutting it anymore in the 21st century. Removing wallpaper is a simple task, and can be quite therapeutic.


You will need :


Wallpaper scraper


Bucket of water


Wallpaper steamer


Instructions:


Turn on your steamer and let it get up to temperature


Once it gets up to temperature, place it on a patch of the wallpaper.


Wait approximately 10 seconds, then use your scraper to scrape the paper away.


Repeat till done


The wallpaper can be harder/easier to come


off so it's really a matter of trial and error to find out the best way of getting it off. Sometimes people find the paper simply falls off in big sheets. Other times it can be almost like melded in with the wall . It can depend on a number of factors.


Somepeople opt for wallpaper remover homemade, instead of the steam method. I have found this very useful if there is wallpaper adhesive that won't come off.


You may want to try this


Vinegar Wallpaper Removal Recipe:


Simply mix warm water and white vinegar in a bucket


Fill into a spray bottle or a sponge


Spray on wall. This will dissolve the adhesive if left for 10+ minutes at a time.


Make sure you scrape it off while it is still wet, or it may just be dry again.


How To Remove Wallpaper With Fabric Softener


Similar to the vinegar method; make sure you wear gloves.


Soak warm water and Fabric softener until it forms a mixture


Pour onto a sponge.


Sponge the wall & let this soak into the paper.


Scrape off after 10 minutes.


Make sure to keep the water warm as it loosens the adhesive faster than cold water.


How To Remove Wallpaper Border


This is the same as wallpaper. It could be slightly trickier as the adhesive may have set, but if you use my advice of the vinegar/fabric softener solution, it should come off in no time! If you are in doubt you could use your steamer.


If you score some lines in a particularly tricky section this will help the steam penetrate through the paper to the wall and loosen it from the inside.


How To Measure A Room


Let's start with the basics, because this is a really important step that a lot of people miss. Grab a tape measure and get someone to hold the other end, then get the length of the walls of the room. Once you have this figure, add them all up . This is the length of all of the walls in the room.


How To Measure For Wallpaper


If you measured your room, great you are almost there. This is similar, but you are going to want to calculate the area of the walls too so you can more accurately measure how many rolls of wallpaper you will need. To calculate square feet you need to measure the height of the room and multiply it by the length. To calculate square meters of a room you need to do the same but make sure you are working in whatever unit of measurement you want to measure in.


How Many Rolls Of wallpaper for an average room?


Some people will say 8-10 but I will say this - there is no ‘average room’ one person's average is very different to another person. So you need to make sure you measure wallpaper properly , accurately and efficiently to your own room specification.


How Many Rolls Of Wallpaper?


Now you have the square feet or meters. You can guesstimate how many rolls you will need. I will say guesstimate as i recommend you always purchase a little over how many you think you'll need incase of emergencies or anything going wrong. Get the wallpaper dimensions and simply divide by the wall dimensions, this will give you an exact number. Some people recommend you round it up by a roll just to be on the safe side.


How To Cut Wallpaper Straight.


You may want to know about how to cut the wallpaper straight. Simply get a T Square, or a spirit level when you cut your paper. Make sure it is at a 90 degree angle to your paper. You could use a stanley knife or some sharp scissors to make the cut.


How To Make Wallpaper Paste


You can buy wallpaper adhesive. But for a cheaper more natural method, you could make some of your own wheat paste, still used in traditional wallpaper methods around the world.


Simply measure 5 cups of wheat flour and 1 cup of sugar and stir.


Heat the mixture on stove


Add 1 gallon of water, using a whisk to work out all the lumps.


Cook until mixture begins to look clear.


Remove from heat and cool to room temperature.


There are have perfect wallpaper paste!


How To Hang PrePasted Wallpaper.


You may want to know how to hang wallpaper. There are a lot of different ways to do this .


Old methods require the paper to be pasted then stuck onto the wall, and a more modern method is pasting the wall , then sticking the paper on. There are no incorrect ways to do this.


Hanging prepasted wallpaper is easy, simply draw a 90 degree angle on your wall. This will be your guide to keeping the paper straight.


Lay the paper on the wall and use a clean sponge with warm soapy water to stick it down. Ensure the corners are secure. Repeat this until you get to a corner


hanging wallpaper on a pasted wall is exactly the same method.


How To Remove Wallpaper Glue


You may notice glue seeping out from your paper. Don't worry this is not going to ruin your paper ,and too much glue is better than too little when it comes to papering, but be aware, when this glue dries, it will be a pain to remove so it is bes tot tr,pbr oy sd soon as you have done it . Try and remove with a warm soapy sponge


How To Wallpaper A Corner


Now we are approaching a pesky corner. A lot of people are scared when they ask me ‘how to wallpaper corners’ because they are afraid to mess up their wallpapering so far. But im here to tell you it isn't as hard or scary as you think !


Never wrap your paper more than 0.5 inches around an inside corner. The natural drying of the glue means the paper will shrink and pull back resulting in possible wrinkling or the paper not sticking to the wall .


Instead, make a seam with the paper, as to disguise the natural overlap.


This may take some getting used to and getting it perfect, but it is true that the corners of a room are where the human eye is drawn first, so it is best to get these bits perfect and the rest will follow!


How To Wallpaper Around Pipes


Wallpapering around pipes is easy, cut the paper to size, and then simply score out notches where the pipes go. You can alternately draw an outline with a pencil and peel the paper back slightly and cut the paper to size this way. It entirely depends on the size and shape of the paper and the pipes as to which direction you want to go down.


Why Wallpaper?


Hopefully I have given you some insight into how to wallpaper and how easy it is once you have got the ‘hang’ of it… (pun intended). All jokes aside I think wallpapering is an invaluable life skill and it can brighten up the dullest room. Knowing how to wallpaper yourself also can save a lot of money, time and effort in finding a reliable professional.


The post How To Measure For Wallpaper – and Other Wallpaper FAQ’s Find more on: www.adetailedpalette.com


via A Detailed Palette - Feed https://www.adetailedpalette.com/how-to-measure-for-wallpaper-and-other-wallpaper-faqs/
How To Hide TV Cords

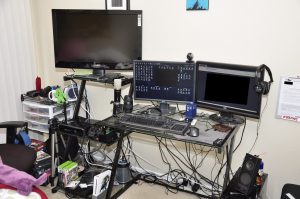
Hiding TV cords can be a pain, especially if you have a minimalist apartment and approach to design. Those pesky cords will get in the way of your apartment looking chic and stylish. But not for much longer. I have a couple of ways to hide these cords and make your space look as clean and elegant as possible.


Cut a PVC tube in a spiral - this will act as a binding or wire wrap for your cables. You can get the right colour to match your space.


These are also paintable and mounts onto the wall flat so it isn't bulky and can hide a lot of cables.


The following blog post How To Hide TV Cords is available on ADetailedPalette


via A Detailed Palette - Feed https://www.adetailedpalette.com/how-to-hide-tv-cords/

Top 5 Favourite Entryway Rugs

Rugs have been around for about the same amount of time that humans have. Firstly originating with animal skins and hides, the art then moved on to crudely woven reeds and other plant material. Then we get the more conventional methods that we still use to this day, including wool and weaving.


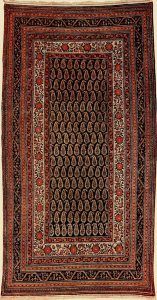
So, it's time to pick my top 5 favourite entryway rugs. Have you ever walked in a house and thought it was a bit lacking as you opened the door? These rugs will give that pop of colour, or the neutral base to tie a room together.


1. Oriental Rugs

The colours in this rug are amazing as well as the pattern. Having this on a plain wall staircase landing would be the best bet, but these types of rug also fit in if you have a more colourful living space. As long as the colour matches a house colour scheme that has already been established.


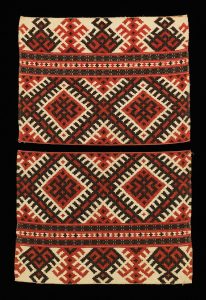
2. Russian rug. The beautiful colours in this shop window are inspiring. It would be perfect in a house with beautiful natural light.


3. Abstract rug

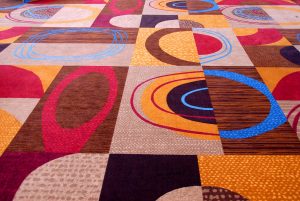
This abstract rug might remind you of the 60s but it is very stylish and would look perfect in a minimalist home. The colours and shapes are very original and guests are always going to remember it!


4. Armenian Rug

This classy number will be the talk of your next house party. Want something original and unique, at a good price? This Armenian rug would set you back only £200. We love a bargain.


5. White Rug

Pure and simple. Elegant and chic. What more could you want than this classic. Great for highlighting specific features in our home. Tell us what you think!


The following post Top 5 Favourite Entryway Rugs See more on: adetailedpalette lighting


via A Detailed Palette - Feed https://www.adetailedpalette.com/top-5-favourite-entryway-rugs/

Apartment Transformations Bedroom

You know how in mystery novels or maybe even dramatic-thriller type movies, there's that often repeated line of "things aren't always as they seem"? Of course, that isn't the only variation that's used, but I think it's been done quite a lot throughout the years. That's honestly how I feel about the internet sometimes. I am not writing anything new, as we all know that most people share only their curated "highlight reel" on social media. I know that I myself tend to do this, and I think it's really only natural. That said, I think it can be really easy to look past that knowledge when it comes to interior design. To me, it seems that many people who I follow decorate and redecorate at almost a lightning-like speed. It seems to all come together so quickly and I am left feeling inspired, but also desperately wishing that my own pace could follow suite.


After asking a few accounts about how long it took them to get to where they are, I found that I was completely mistaken. Most replied with "years!" and I was reminded that it's never actually completed as quickly as it may appear from the outside looking in. I then found myself wondering if that's what people think about the things I share - that this all happened essentially overnight or that I somehow quickly decorated when in fact, it's been quite the opposite. So I wanted to share some of the biggest transformations that my apartment has overcome throughout the three years we have now lived here. Since there have been quite a few, I decided to first share the bedroom today and to share the rest later on throughout the month.


The Bedroom


The very first iteration - we used what we had and even at the time I was not over the moon about this set up. In fact, I really hated it, but had to put up with it for a while. I wanted better curtains and a more restful space overall, but not only had to find the right pieces but also had to work within the confines of my budget.


I really loved yellow and gray and updated the space accordingly. The duvet cover really helped to make the space more soft and restful overall, and I think it was one of the best purchases I've made for the bedroom when it comes to how impactful the colour change really was.


We grew a bit sick of the yellow and changed things up a bit yet again, this time with just a touch of the colour. I still wanted to update the curtains and really wanted a tufted headboard to replace the old and rather beat up one that we had. Unfortunately, these headboards were incredibly expensive and every D.I.Y. I looked into for tufted headboards seemed much too complicated.


Then I finally found one on sale and made the purchase. It inspired some new styling overall and it completely changed the look of the room. Longer curtains were finally added as well.


I finally painted the dresser as well, keeping with the grey colour palette and bringing about more of a soft feel to the overall space.


An update to the living room brought the old TV and shelf into the bedroom. The cube shelf was also painted the same grey to keep things consistent and harmonious.


Which brings us to the most recent version of the space.


It certainly has come a long way - but all of this took quite some time. Time is necessary, I think, for you to find just what you're looking for. It's something I need to remind myself of often as I am not the most patient person in the world. Still, I am so proud of all the work I've been able to tackle in this small space all while working within a pretty limited budget.


Thanks for following along my bedroom decorating journey today. Hopefully this inspired you, but also made you realise that everything takes time even if it may not seem so - especially when it comes to decorating! Have a wonderful Wednesday!


-Rachel


The following article Apartment Transformations Bedroom Find more on: https://adetailedpalette.com/


via A Detailed Palette - Feed https://www.adetailedpalette.com/apartment-transformations-bedroom/

General Decorating Tips

Decorating or maybe even interior styling seems to be something that can be kind of tricky for some people. I have gotten a few questions about it on Instagram so I thought I'd share a few general tips that I think most people can apply to their space, no matter the style or the square footage.


Embrace the Editing Process


As with many things, we usually want instant gratification. We want to have our spaces completely decorated and finished quickly so that we can get back to other things on our to do list and just enjoy the space. While I do think every home should be a joy to be in, I don't know that being completely finished decorating can ever be truly accomplished. I say embrace the editing/refresh process. I generally style something and leave it for a few days - if there's something off about it, I edit. I add a few things, maybe move other pieces else where. Maybe the layout isn't quite as aesthetically appealing as I thought or maybe it's just not practical. Whatever the case, I come back and edit as the days pass, and I eventually get it set up exactly how I want it for the time being. Don't be afraid to revisit previously styled/decorated nooks with a new eye. I have done this a few times for both the console table behind the sofa and the bar cart.


Pay Attention to the Colour Palette


If you have different styles, using color as a theme throughout the space is the easiest way to keep the room feeling cohesive. Sticking to a colour palette also helps to give more order. A really good rule of thumb is the 70-20-10 rule - 70% of the space being the primary colour (usually neutral) and the others (20% and 10%) being the bolder accent colours. This acts as a way to keep your colour usage in check and also in balance. This doesn't mean that you can only have three colours, but limiting your spaces to three main colours is usually a good call.


Always Be Practical


Don't style things only for the sake of how they look - it's not going to work out in the long run. Consider flow and just be practical about placement. Something that you use every day maybe shouldn't be difficult to reach. Maybe you shouldn't stack items on top of a pile of books that you actually want to read.


Don't Forget About Your Angles!


It might sound like advice straight out of America's Next Top Model, but consider angles and how things group together when styling. Everything should have a flow and should be visually interesting (meaning there should be some diversity going on). You don't want everything to be placed the same way, have the same texture, or to have the same lines. Juxtaposition is key to decorating and interior styling.


That's all - I hope that these aren't too basic or general so as to be unhelpful... hopefully they instead apply to many of you and can help you when organise


and styling your home.


Have a wonderful Wednesday!


The blog post General Decorating Tips is courtesy of ADetailedPalette


via A Detailed Palette - Feed https://www.adetailedpalette.com/general-decorating-tips/

How I styled my desk


Home office setup ideas


I believe that we often underestimate how much of an impact styling, organization, and design can have on how we behave in certain environments. A really good example of how design can drive behavior is the way a grocery store is designed and organized; it's literally organized in a way to drive sales and make you spend as much money as possible (i.e. impulse buys near the checkout). It's incredibly interesting, of course, but can also be applied practically. I think a great example of designing to drive behavior is your desk surface, and since I was recently told by a friend who was visiting how much they loved the "cozy home office" portion of the apartment, I thought I would share how I approached styling the area. I have outlined the styling approach and the items I have found to be essential in keeping my desk space tidy and a driver of both inspiration and productivity (and no, I haven't purchased a standing desk just yet...)


Ambient Lighting:


I know it's a bit obvious, but I will give you some information on the basics of lighting. There is a reason why every desk ever has a Task Light/Pendant style light. I wanted a design that was stylish, but would still get the job done, so I went with copper pendant lights. Task lighting is so important because good lighting in general is important so that you can actually get stuff done. Natural light is recommended in terms of productivity, but even if you don't have an office with a window - task lighting can help. Reading lamps can also provide a good natural light for your eyes. I also purchased some cluster pendant lights for my office space - very industrial, with a steampunk vibe, this combination gives a well balanced light all around the room. Check out my portfolio about some DIY lighting we did for some clients.


Office Essentials:


Pens, pencils, scissors, rulers, notebook, planner, headphones - these are practical items that I typically leave on the desk surface. To me, these items are necessary to have within easy reach - I don't want them buried away in a drawer. Consider the items you use all the time and consider their placement. If you don’t already - you need to get down to your nearest office outlet with your office essentials list.


Maybe for you it's a pile of reference books, a calculator, and pens. Whatever the case may be, having these items within easy reach ultimately just saves time. It's not clutter when it's useful.


Best office layout for productivity


Since I had the space (my desk surface is rather large, which is lovely), I sort of split my desk by halves. When looking at it, you can see that the left hand side is more focused on everyday items, while the right-hand side has more of a focus on creative items. I use these items often enough to have them on the desk, but not every day.


I like having it broken up this way and think it gives a little bit more flow and organization to the desk as a whole. I also have my snake plant on the right of my desk and a large office plant on the left. My colleagues call it my 'office desk garden'...


Home Office Inspiration:


The small gallery wall above the desk, along with some of the decor like the fresh flowers, fox candle, and miniature Eames chair, not only help to give the space more personality, but also help to serve as sparks of inspiration. The grid photo wall that I customized features two of my favorite color palettes, photos I took in England, a photo of Reggie, and a picture of the home where one of my favorite authors, Jane Austen, wrote many of her novels. The other images around the center grid include a decorative plant, a motivational quote, and a diffuser. While some of these things may seem a little stereotypical, they are honestly things that I find really inspiring and that's why I added them to the space. Yes, I totally get that quotes especially can come off cheesy and so many people have diffusers, but I picked these items because of the personal stories and the personal sentiments they hold for me and encourage you to do the same when it comes to creating your own sparks of inspiration.


If these wall hangings aren't your thing, and you prefer a cleaner look and wall in front of you; you could try and change things up by putting up some minimalist wallpaper. Staring at a completely white blank wall can be maddening for those 8 hours a day, so this wallpaper just gives it that extra bit of something. Not too garish but something to think about when you are having a break from staring at the screen.


How to organise a desk without drawers:


This is vital for actually keeping your desk surface clean. I installed a keyboard tray which gives another layer to dot things around on. It also hides away my keyboard and mouse when I am not using them, and maybe jotting something down in my notebook instead. Thankfully, I do have some trays on the desk where keep items, such as paperwork, calligraphy supplies, charging cords, etc.


Hope this gave you some ideas on your workspace! Have a great day


How I styled my desk Find more on: ADP interior design


via A Detailed Palette - Feed https://www.adetailedpalette.com/how-i-styled-my-desk/

Office Plants and Succulents: Our Portfolio

Our client wanted some low maintenance plants for the office.

This would be used to improve air quality and ones that required little to no natural light.

We found the perfect solution for our client.


We worked with a Digital Marketing company in Manchester to help them freshen up their office space. And what is fresher than plants? Providing free Oxygen and purifying the office air. Plants are really in these days and we wanted to really go all out.


We gathered some Antique hobnail milk glass planters and set to work in the office space choosing the perfect plants for the lighting available. We came across $9 Hydrangeas and felt they would add a perfect pop of colour to the workspace.

Take a look at the results here


The following post Office Plants and Succulents: Our Portfolio was originally published to A DETAILED PALETTE


via A Detailed Palette - Feed https://www.adetailedpalette.com/office-plants-and-succulents-our-portfolio/

Shabby Chic French Restaurant: Our Portfolio

This rustic looking restaurant was in need of a little bit of love and a well needed make over. We reused and repurposed many items to help it reserve its natural charm but add a modern shabby chic element. Industrial french restaurant with low lighting Find out more about the furniture we used here: https://www.adetailedpalette.com/portfolio/cozy-french-restaurant/ The following blog post Shabby Chic French Restaurant: Our Portfolio was originally published on https://adetailedpalette.com/ via A Detailed Palette - Feed https://www.adetailedpalette.com/shabby-chic-french-restaurant-our-portfolio/